We all like to make sand castles. Here are two examples and two different recipes for making them . . . maybe for a little beach fairy!
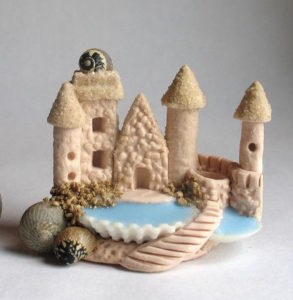
Permanent Sand Castle
Make a small sandcastle using tiny cups and boxes as forms or triple the recipe for a king-size castle.
2 cups of sand
1/3 cup wheat paste powder (from hardware store)
1 cup water
Mix the sand and wheat paste powder with your hands in a large bowl.
Add the water and stir everything up until the consistency of clay. Bring out the cookie cutters, paper cups, cans, and sculpting utensils. Use a piece of wood or cardboard as a base if you are making a sand castle. It may take several days to dry.

Permanent Sand Castle
What you need:
Sawdust — Usually free at your local hardware store or lumber yard
Wallpaper paste powder also at a hardware store, but not free
Water
Sand castle molds, cans, and paper cups
Forks, knives and spoons for sculpting and molding
Mix 2 cups of saw dust and 1 cup of wallpaper paste powder with your hands in a large bowl. Add 1 cup of water and stir until it’s all mixed together. Pack the mixture into your mold and carefully take it out. When you’re done, let it dry in a sunny place for a few days. If you really want it to look like a sand castle, you can decorate it with sea shells or paper flags.

NATURAL CLAY
When I first introduce young chuildren to clay I give them a small piece and see if they can roll it between the palms to form a ball. A real exercise for young children. It is a little easier for them to roll it with one hand into a snake and maybe make a coil pot. Sometimes we make pinch pots (seed pots) by punching thumb into the middle of the clay ball and pinching up the sides. It’s good to let them play with natural clay and see what they discover! I like to get them talking about different ttypes of soil, where you find it, and how we use it. They can learn that if it dries out, they can put it in a little water and it will get soft gain. If they wrap their piece in a damp cloth it will stay soft. It’s a good opportunity to discuss absorption and evaporation too!
Young children especially love to play with clay. It isn’t as messy as the colored clay you buy and comes off and washes out easily. Plus it’s all natural and if you know where to dig it – it’s free. Sometimes lake dams are made using clay and you can dig up some that has washed beyond the dam. It is different colors and I have dug gray, red, and white clay.
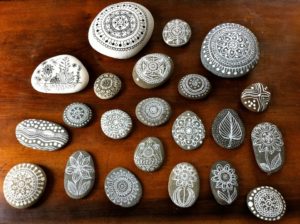
I make up small balls of clay about an inch across and give one to each child. They flatten it with the palm of their hand and with a little pressure make a print of small seashells or animal tracks. They can remove the seashell or other item from the clay with a toothpick and use it to punch a hole through the top to hang it and put their initials on the back. They can use the toothpick to decorate it as well with a border. Then it must be fired in a kiln which is very inexpensive. If you want, they can paint them after they are fired.
Animal track reproductions were used for those in the picture. You can order them from Nature Watch. Individual tracks run $9.95 each or a set of 16 different tracks for $149.20 – # 205z www.nature-watch.com
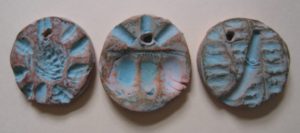
Seed Prints – They are fun to make and allow kids to examine different kinds of seeds. Give students a piece of clay and ask them to roll it into a ball. This can be difficult for young children, but good exercise. They flatten it with the palm of the hand and carefully push the seed into the clay. Use toothpicks to lift the seed out. If given a larger piece of clay, kids can print one large seed in the center (peach) and print a border with smaller seeds. Sand clay is easier and cheaper and it doesn’t need to be fired. Real clay comes out more detailed and after fired, kids can paint them. Punch a small angled hole in the back for hanging on a nail or a hole through the top to hang from a string.


Homemade Modeling Clay – Mix half a cup of PVA glue (white glue) with 1 cup of cornstarch, to make this clay. It’s soft, light, malleable, not sticky and easy to shape and mould. It’s white and easy to paint after dried, or you can add food coloring to the glue. Put it in the oven at 100ºc for about an hour to harden or leave it out and it will harden over night.
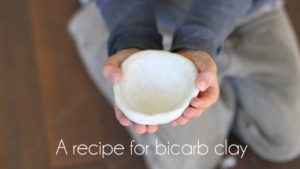
Bicarb Clay
400g bicarb soda
100g corn flour
250ml water
1 Tbs vegetable oil
Combine ingredients in a pot and heat over medium heat, stirring constantly.
The liquid will start to thicken into a paste, keep stirring. When dough resembles thick mashed potatoes remove from heat and let cool slightly. Remove the dough from the pot and knead. It will be silky, smooth and clay-like.
To make a pinch pot shape the clay into a small round ball. Poke a hole in the top of the ball about halfway through. Begin to work that hole and stretch it so that it becomes wider, pinching with your thumbs and forefingers. Shape the bowl into your desired depth and size. Bake in the oven for about 20-30 minutes at a low temperature (approx. 120˚C) until hard all the way through. Paint as desired.
Sand Clay
2 cups fine sifted sand
1 cup water
1 cup cornstarch
Saucepan and spoon
Mix sand, cornstarch, and water in a saucepan
For color add a few drops of food coloring or natural dye
Cook over medium heat, stirring constantly
When mixture thickens, remove from heat
Carefully pour into a dish and let cool
Drape a wet towel over the clay to cool more quickly
Sculpt into what you choose or make interesting prints by pressing things into the clay
To make stronger clay, mix about 1/8 cup of Elmer’s glue to the mixture before cooking
Sand Clay Prints
Fun to do and if you add a little elmers glue they get very hard
After made you can roll it into small balls that can be pressed down with the palm into a fat little biscuits
Press the seed or shell into the center
Have toothpicks on hand to remove the object printed from the sand clay
The toothpick can be used to add a border around them
Poke their name or initials on the back with the tooth pick
Put a hole in the back to hang on a nail or punch a hole through it to hang as ornament
You can print seeds, sea shells, or footprints
SAND DRAWING

SAND PAINTING
You can get at least 3 colors, maybe four colors of sand from a landscape company. Take a few gallon bags and they will usually give you the sand you need. The very small hand sifters are great for this or they can use their hands to sprinkle the sand.
Use white tag board and lay down one glue line at a time. Sift one color of sand over it.
Empty the board of sand and do the next line or lines of a different color.
It’s nice to use the natural colors of sand and it is a good time to discuss soil, colors of sand (black, white, grey, golden, orange and pink), where you find sand, and how is it made!
If you can’t find sand, you may make salt pictures. Tint salt by adding a few drops of food coloring to a jar and shaking. Then spread and allow to dry.
You can frame the pictures with tiny shells, seeds or pebbles.
Trace hand in clay, decorate and shape!