by Susan Dean | Feb 6, 2018 | Self Science
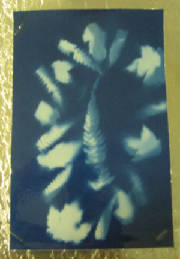
SUNPRINTS
These are fun to make.
You can order the paper – PE1435 11X17 NATURE PRINT PPR PK2 ( $22.44 with shipping) from S&S worldwide(800) 288-9941.
There are 20 large sheets and I cut each into 4 pieces which are large enough for a print.
Album pages from photo albums that have the clear cover that peels back works great for holding the leaf designs on the paper and in place.
Take them outside and expose to the sun for a few minutes and then bring them inside
Remove the leaves and put into a tray of water for a minute to develop, then let dry.
GET PAPER FOR SUN ART HERE
by Susan Dean | Feb 6, 2018 | Self Science

Ojo de Dios
The Huichol Indians of Mexico and the Aymara Indians of Bolivia weave brightly colored yarn on a simple frame of crossed sticks to make a design called “Ojo de Dios”(O-ho-deh DEE-os) or “Eye of God”. Children of the Huichol(WEE-chol) tribe in Mexico carry Ojo de Dios wands on a special holiday. Originally, “God’s Eyes” were made to be placed on an altar so that the gods could watch over the praying people and protect them by reminding us that God looks with love on people everywhere. The Huichoi call their God’s eyes Sikuli, which means ” the power to see and understand things unknown.” When a child is born, the central eye is woven by the father, then one eye is added for every year of the child’s life until the child reaches the age of 5.
Simple method for children:
Glue small popsickle sticks together in a cross.
Wrap yarn around the center and then each stick.
Glue yarn to stick to wrap another color as you like.
When finished, glue the end.
It can be a simple or complex weaving made across 2 or more sticks.
You may use 2 small sticks such as smooth tree branches or popsicle sticks or dowels
You will need scissors, pencil, yarn or thread.
Small Bells for decoration are optional.
Cross the sticks at the center.
Tie them together with the end of a piece of yarn, making an X, but don’t cut the yarn off its skein.
Tie the yarn IN BACK of the 2 crossed sticks.
With the pencil, number the sticks at the ends.
Bring the yarn to the front between sticks 3 and 4.
Pull the yarn over stick 3 and the next one too (stick 2), and bring it to the back between sticks 2 and 1.
Wrap it behind stick 2 and bring it to the front again between sticks 2 and 3.
Pull it over stick 2 and the next one too (stick 1), and wrap it behind stick 1.
Pull the yarn over stick 1 and the next one too (stick 4) and wrap it behind stick 4. Pull it over stick 4 and the next one too (stick 3) and wrap it behind stick 3.
This is one complete round.
Always lay the yarn next to, NOT on top of the yarn already in place.
Keep on wrapping the yarn behind each stick, over that stick and the next, and around behind that one, then over that stick and the next and behind that one.
After the first few rounds, you will see the woven pattern of the “eye” beginning to form. When you have an “eye” in one color of yarn, you can cut the yarn and tie on another color, and continue weaving.
Make sure that the knot that you joined the 2 colors with, stays in the back.
Keep weaving the “God’s Eye” until you are near the ends of the sticks.
Cut the yarn, leaving a tail. Tie the tail in a knot in back.
If you have bells for decoration, attach one to each of the 4 ends.
At Christmas you can hang them on your tree.
They can also be made in miniature with the thread wound on toothpicks, but these are delicate and much harder to handle.
by Susan Dean | Feb 6, 2018 | Self Science
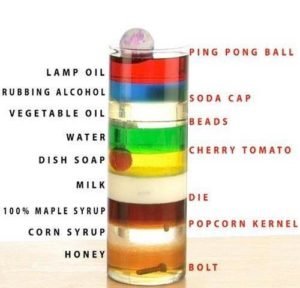
Layering liquids
Light corn syrup
Water
Vegetable oil
Dawn dish soap (blue)
Rubbing alcohol
Lamp oil
Honey
Graduated cylinder
Food Coloring or Coloring Tablets
Food baster
9 oz portion cups
It is not necessary to layer all of these liquids but use the ones you have. Measure 8 ounces of each type of liquid into the 9 ounce portion cups. Color each of the liquids. Light corn syrup is easier to color than dark syrup. The only liquids that you may not be able to color are the vegetable oil and the honey.
Start the column by pouring the honey into the cylinder. Then pour each liquid SLOWLY into the container, one at a time. It is very important to pour the liquids slowly and into the center of the cylinder. Make sure that the liquids do not touch the sides of the cylinder while you are pouring. It’s okay if the liquids mix a little as you are pouring. The layers will always even themselves out because of the varying densities. After the column of liquids is formed let it sit in a safe place to observe. Pour the liquids in the following order:
Honey
Corn syrup
Dish soap
Water
Vegetable oil
Rubbing alcohol
Lamp oil
The same amount of two different liquids will have different weights because they have different masses. The liquids that weigh more (have a higher density) will sink below the liquids that weigh less (have a lower density).
Material Density
Rubbing Alcohol .79
Lamp Oil .80
Baby Oil .83
Vegetable Oil .92
Ice Cube .92
Water 1.00
Milk 1.03
Dawn Dish Soap 1.06
Light Corn Syrup 1.33
Maple Syrup 1.37
Honey 1.42
To test this you can measure the weights of equal portions of each liquid. You should find that the weights of the liquids correspond to each different layer of liquid. By weighing these liquids, you will find that density and weight are closely related.
Density is how much “stuff” is smashed into a particular area… or a comparison between an object’s mass and volume. Remember the all-important equation: Density = Mass divided by Volume. Based on this equation, if the weight (or mass) of something increases but the volume stays the same, the density has to go up. Likewise, if the mass decreases but the volume stays the same, the density has to go down. Lighter liquids (like water or rubbing alcohol) are less dense than heavy liquids (like honey or corn syrup) and so float on top of the more dense layers.

by Susan Dean | Feb 6, 2018 | Self Science

Fizzing potion
Fill a small container ½ full of vinegar and add food coloring
Sprinkle soda in container of vinegar
White vinegar
Food coloring
1tbl. Baking soda
by Susan Dean | Feb 6, 2018 | Self Science
Carbon Dioxide Balloon
You will need:
small plastic soda bottle
vinegar, baking soda
2 balloons
funnel
Put about 1/3 cup of vinegar into the soda bottle.
Fill one of the balloons with about 2 tablespoons of baking soda using the funnel
Without letting the baking soda fall into the bottle cover the mouth of the bottle with the mouth of the balloon
Raise the balloon so the baking soda falls into the bottle
The reaction will forn CO2 that will blow up the balloon
Tie the balloon off
Fill the other balloon with air.
Throw them up in the air and compare their weight. CO2 is heavier than ordinary air and will fall to the ground first. Sometimes I use this experiment when I do a program on grains. This shows how the reaction occurs when making bread and the bread rises creating the holes in the bread.
by Susan Dean | Feb 6, 2018 | Self Science
Borax Snowflake
Materials: string, wide mouth jar, white pipe cleaners, borax (May use sugar or salt but it will take longer for crystals to form), pencil, boiling water, scissors.
Twist 3 pipe cleaners together at centers to make 6 arms and trim evenly if needed.
Tie string to one arm and tie other end to pencil.
Fill jar with boiling water and add borax (3 tblsp/1 cup water) stirring till no more will dissolve.
Put pipe cleaner in jar hanging from pencil and let stand overnight undisturbed.
If you want you can add food coloring to borax water for color.
What happens:Hot water will hold more dissolved borax than cold. As water cools crystals stick to pipe cleaner and begin to grow. If the water cools quickly you get small crystals. If it cools slowly you get larger crystals.