by Susan Dean | Feb 1, 2018 | Gardening

HOW TO HAVE SUPER YIELDS FROM THE GARDEN
Build up your soil. Building up the soil is the single most important factor in better yields. A deep, organically rich soil encourages the growth of healthy, extensive roots that are able to reach more nutrients and water. The fastest way to get that deep layer of fertile soil is to make raised beds. Raised beds yield up to four times more than the same amount of space planted in rows. That’s due to their loose fertile soil and efficient spacing. Raised beds save you time. Plants grow close enough together to shade out competing weeds, so you spend less time weeding. The close spacing makes watering and harvesting more efficient. Space smartly. To get the maximum yields from each bed stagger the plants by planting in triangles. Don’t space plants tightly. Weight yield per square foot is more important than the number of plants per square foot. Tight spacing can stress plants, making them more susceptible to diseases and insect attack.
You can grow more by going vertical. Grow space-hungry vine crops—such as tomatoes, pole beans, peas, squash, melons, cukes, and so on—straight up, supported by trellises, fences, cages, or stakes. Growing vegetables vertically saves time and harvest and maintenance are easier. Upward-bound plants are less likely to be hit by fungal diseases thanks to the improved air circulation around the foliage. Try growing vine crops on trellises alongside raised beds. Use sturdy end posts with nylon mesh netting or string to provide a climbing surface. Tie the vines to the trellis. Don’t worry about securing heavy fruits. They will develop thicker stems for support. Plant compatible crops saves space. The Native American combination of corn, beans, and squash works. Sturdy cornstalks support the pole beans, while squash grows freely on the ground below, shading out competing weeds.
Other compatible combinations include tomatoes, basil, and onions; leaf lettuce and peas or brassicas; carrots, onions, and radishes; and beets and celery. Succession planting allows you to grow more than one crop in a given space over the course of a growing season. You are able to harvest three or even four crops from a single area. An early crop of leaf lettuce can be followed with a fast-maturing corn, followed by more greens or overwintered garlic—all within a single growing season. To get the most from your succession plantings: Use transplants. A transplant is already a month or so old when you plant it, and so will mature.
Choose fast-maturing varieties. Replenish soil with layer of compost each time you replant. Adding a few weeks to each end of the growing season can buy you enough time to grow yet another succession crop—say a planting of leaf lettuce, kale, or turnips—or to harvest more end-of-the-season tomatoes. To get extra weeks of production keep the air around your plants warm even when the weather is cold by using mulches, cloches, row covers, or cold frames. Give heat-loving crops (melons, peppers, and eggplants) an extra-early start by using two “blankets”—one to warm the air and one to warm the soil in early spring. About 6 to 8 weeks before the last frost date, preheat cold soil by covering it with either infrared-transmitting (IRT) mulch or black plastic, which will absorb heat. Then, cover the bed with a slitted, clear plastic tunnel.
When the soil temperature reaches 65° to 70°F, set out plants and cover the black plastic mulch with straw to keep it from trapping too much heat. Remove the clear plastic tunnel when the air temperature warms and all danger of frost has passed. Install it again at the end of the season, when temperatures cool.
Round out your beds. The shape of your beds can make a difference. Raised beds are more space-efficient if the tops are gently rounded to form an arc, rather than flat. A rounded bed that is 5 feet wide across its base, for instance, will give you a 6-foot-wide arc above it—creating a planting surface that’s a foot wider than that of a flat bed. That foot might not seem like much, but multiply it by the length of your bed and you’ll see that it can make a big difference in total planting area. Lettuce, spinach, and other greens are perfect crops for planting on the edges of a rounded bed.
Grow up No matter how small your garden, you can grow more by going vertical. Grow space-hungry vining crops—such as tomatoes, pole beans, peas, squash, melons, cukes, and so on—straight up, supported by trellises, fences, cages, or stakes. Growing vegetables vertically saves time. Harvest and maintenance go faster because you can see exactly where the fruits are. And upward-bound plants are less likely to be hit by fungal diseases thanks to the improved air circulation around the foliage. Try growing vining crops on trellises along one side of raised beds, using sturdy end posts with nylon mesh netting or string in between to provide a climbing surface. Tie the growing vines to the trellis.
by Susan Dean | Feb 1, 2018 | Gardening
Five of the most effective mosquito repelling plants
1. Citronella is a common natural ingredient in mosquito repellents. The aroma is a strong smell that masks other attractants to mosquitoes. It is used in scented candles and torches. The living plant is more effective because it has a stronger smell. Citronella is a perennial ‘clumping’ grass, which grows to a height of 5 – 6 feet. It can be grown directly in the ground in climate zones where frost does not occur. Citronella plants are considered low maintenance.They do best in full sun and well-drained locations. When purchasing citronella, look for the true varieties, Cybopogon nardus or Citronella winterianus.
2. Horsemint (or Bee balm) is an adaptable perennial plant that gives off a strong incense-like odor that confuses mosquitoes by masking the smell of its usual hosts.
Horsemint is a fast growing, shade-tolerant and drought-resistant plant which reaches a height and width of 2 – 3 feet. It does well in dry, sandy soil and can tolerate salty conditions. It is often found in coastal and beach areas. Horsemint leaves can be dried and used to make herbal tea. Its flowers will also attract bees and butterflies to your garden.
3. Marigolds are hardy annual plants with a distinctive smell that mosquitoes find particularly offensive. Marigolds contain Pyrethrum, a compound used in many insect repellents. Marigolds prefer full sunlight and reasonably fertile soil. Potted marigolds can be positioned near entrances to your home and any common mosquito entry points, such as open windows. The smell may deter mosquitoes from going past this barrier. Besides repelling mosquitoes, marigolds repel insects that prey on tomato plants, so you may want to plant a few marigolds in your tomato bed for added protection.
4. Ageratum emits a smell which mosquitoes find particularly offensive. Ageratum secretes coumarin, which is widely used in commercial mosquito repellents.
Ageratum is a low-lying annual ornamental plant that will thrive in full or partial sun and does not require rich soil. It is often displayed in rock gardens where low-lying plants are favored. Although the leaves of Ageratum can be crushed to increase the emitted odor, it is not advisable to rub the crushed leaves directly on the skin.
5. Catnip is a natural mosquito repellent. Entomologists at Iowa State University reported to the American Chemical Society that catnip is ten times more effective than DEET, the chemical found in most commercial insect repellents. Catnip, Nepeta cateria, is very easy to grow. Some people apply crushed catnip leaves or catnip oil for more robust protection. Cats will respond to you similarly as they would respond to the plant itself. Cat owners may want to choose an alternative plant for repelling mosquitoes.
Many commercial insect repellents contain from 5% to 25% DEET. There are concerns about the potential toxic effects of DEET, especially when used by children. Children who absorb high amounts of DEET through insect repellents have developed seizures, slurred speech, hypotension and bradycardia.
by Susan Dean | Feb 1, 2018 | Gardening, Herbs

Herbs for Repelling Insects Herbs were our original household cleaners, disinfectants, and bug repellents! andThey were used with good results before humans came up with toxic chemicals. Herbs are better for the environment and continue to work for you when you put them in the compost heap. They enrich soil, add nutrients, and some like valerian attract earthworms.
- Basil Delicious in pesto, tomato dishes, and salads. It is one of the best ways to keep flies out of your house. Plant basil next to the doors or use as a foundation planting mixed in with flowers. Flies will stay far away. Mosquitoes don’t like it either.
- Bay Leaf Grow bay outside in S.C. Buy dried bay leaf if you are unable to grow it; Dried basil works for keeping pests away. One bay leaf in white flour keeps weevils out and also protects barley, cornmeal, oatmeal, quinoa, and rice. Scatter a few leaves on shelves to repel moths, roaches, earwigs, and mice. Flies hate the smell of bay leaves.
- Lavender Small amounts add a wonderful floral and citrus flavor to baked goods, meats, and vegetables. It repels moths, mosquitoes, and fleas. Hang a bundle in your closet or lay sprigs with the stored clothes. Grind and sprinkle on your pet’s bedding. It repels mosquitoes, keeps rabbits out of your lettuce and spinach.
4. Mint, catnip, and pennyroyal planted around the foundation of your house will keep ants and mice out. Pennyroyal is repugnant to fleas, ants, flies, and mosquitoes. Large amounts of pennyroyal can be toxic to pets and children.
5. Rosemary repels mosquitoes and keeps moths out of clothing..
6. Sweet Woodruff is used to deter carpet beetles and moths. Lay it beneath wool carpets. It releases a sweet scent when you walk across your rugs.
7. Tansy repels flies, ants, fleas, moths, and mice.

Five of the most effective mosquito repelling plants
1. Citronella is a common natural ingredient in mosquito repellents. The aroma is a strong smell that masks other attractants to mosquitoes. It is used in scented candles and torches. The living plant is more effective because it has a stronger smell. Citronella is a perennial ‘clumping’ grass, which grows to a height of 5 – 6 feet. It can be grown directly in the ground in climate zones where frost does not occur. Citronella plants are considered low maintenance.They do best in full sun and well-drained locations. When purchasing citronella, look for the true varieties, Cybopogon nardus or Citronella winterianus.
2. Horsemint (or Bee balm) is an adaptable perennial plant that gives off a strong incense-like odor that confuses mosquitoes by masking the smell of its usual hosts.
Horsemint is a fast growing, shade-tolerant and drought-resistant plant which reaches a height and width of 2 – 3 feet. It does well in dry, sandy soil and can tolerate salty conditions. It is often found in coastal and beach areas. Horsemint leaves can be dried and used to make herbal tea. Its flowers will also attract bees and butterflies to your garden.
3. Marigolds are hardy annual plants with a distinctive smell that mosquitoes find particularly offensive. Marigolds contain Pyrethrum, a compound used in many insect repellents. Marigolds prefer full sunlight and reasonably fertile soil. Potted marigolds can be positioned near entrances to your home and any common mosquito entry points, such as open windows. The smell may deter mosquitoes from going past this barrier. Besides repelling mosquitoes, marigolds repel insects that prey on tomato plants, so you may want to plant a few marigolds in your tomato bed for added protection.
4. Ageratum emits a smell which mosquitoes find particularly offensive. Ageratum secretes coumarin, which is widely used in commercial mosquito repellents.
Ageratum is a low-lying annual ornamental plant that will thrive in full or partial sun and does not require rich soil. It is often displayed in rock gardens where low-lying plants are favored. Although the leaves of Ageratum can be crushed to increase the emitted odor, it is not advisable to rub the crushed leaves directly on the skin.
5. Catnip is a natural mosquito repellent. Entomologists at Iowa State University reported to the American Chemical Society that catnip is ten times more effective than DEET, the chemical found in most commercial insect repellents. Catnip, Nepeta cateria, is very easy to grow. Some people apply crushed catnip leaves or catnip oil for more robust protection. Cats will respond to you similarly as they would respond to the plant itself. Cat owners may want to choose an alternative plant for repelling mosquitoes.
Many commercial insect repellents contain from 5% to 25% DEET. There are concerns about the potential toxic effects of DEET, especially when used by children. Children who absorb high amounts of DEET through insect repellents have developed seizures, slurred speech, hypotension and bradycardia.
 Mothballs
10 Tbsp dried lavender flowers
Mothballs
10 Tbsp dried lavender flowers
20 drops Lavender oil
20 drops Cedar Wood oil
5 pieces of fabric, cut into squares
Ribbon and scissors
In a bowl, combine lavender flowers with essential oil. Stir until lavender fully absorbs the oils. Transfer to a glass jar, cover and store for 24 hours. Spread each piece of fabric on a flat surface. Place 2 Tbsp of the lavender mix onto the fabric. Pull up the corners of the fabric, and tie your ribbon tightly around the loose edges to create a ball. Secure with a bow or knot and trim fabric. Tuck each ball between clothing layers inside your drawers. These homemade mothballs smell good, and they are effective.
by Susan Dean | Feb 1, 2018 | Gardening
Beneficial Garden Insects
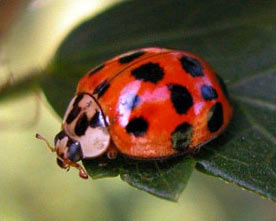
1. Ladybug adults and larvae feed on aphids and other soft-bodied insects. Adults are attracted to flower nectar and pollen, which they must eat before they can reproduce.

2. Lacewings feed mainly on flower nectar. The larvae are voracious predators that feed on aphids, thrips, scales, moth eggs, small caterpillars and mites.
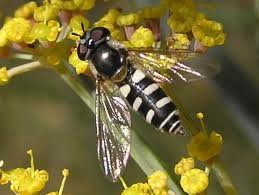
3. Hover Flies or flower flies look like small bees with striped abdomens; the grayish or greenish slug- like larvae have pointed heads. They feed on nectar and pollen. The larvae feed on aphids in tight places where other good bugs can’t go, and are helpful in early spring, before other beneficial insects are active. Flower flies pollinate strawberries and raspberries, producing larger fruits and higher yields.
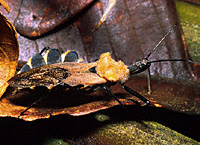
4. Pirate bugs, ambush bugs and assassin bugs prey on many insects, including tomato hornworms, thrips, spider mites, many insects’ eggs, leafhopper nymphs, corn earworms and other small caterpillars. They are attracted to willows, buckwheat, corn, and nectar and pollen from many flowers.

5. Ground beetles feed on slugs, snails, cutworms, root maggots, and Colorado potato beetle larvae. Perennial ground covers, stones, or logs attract them. Rove beetles resemble earwigs without pincers, and feed on many insect pests.
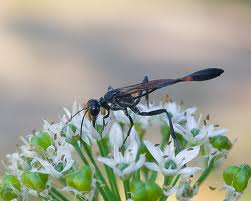
6. Hunting and parasitic wasps There are hundreds of species of wasps, including many so tiny you can barely see them. Mini-wasps attack the eggs of pests, and are one of the most important insect groups that provide control of garden pests.
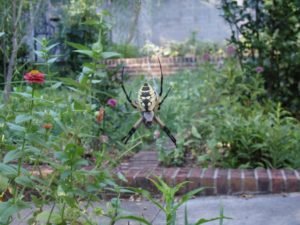
7. Spiders feed on insects and are important in preventing pest outbreaks. Spiders in gardens do not move indoors, nor are they poisonous.
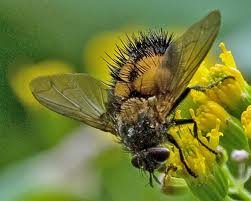
8. Tachinid Flies look similar to house flies and are enemies of cutworms, army worms, tent caterpillars, cabbage loopers, gypsy moths, sawflies, Japanese beetles, squash bugs, and sow bugs.

by Susan Dean | Feb 1, 2018 | Gardening

WEED CONTROL
- Mulch: Mulch is a covering that blocks daylight and inhibits growth under it. Cover the soil between your plants and along rows. Keep mulch from the base of your plants to discourage insect invasions. For mulch, use materials like wheat straw, shredded leaves, or other organic matter. Layer it on the ground about 2 inches thick. For persistent or numerous weeds, try covering the area with dampened newspaper (black ink only) and then cover with 2 inches of mulch. Around the bases of trees and shrubs, consider covering the ground with landscape fabric and then mulch.
2. Cover Crop: In some situations, you can use a cover crop to block weeds.
3. Pull them out: You need manually pull or dig out most weeds getting the root out as well. Weeds will slide out of the soil easier when the soil is wet. I always do a little after a nice rain or when weeds are young.
4. Don’t let them reseed in the garden and multiply if you don’t want more of them.
5. Trim: Keep the edges of your garden mowed to help prevent a weed invasion.
6. Plant Close: If the soil is rich and well tilled, plant your plants closer together. This will cut down weed growth. Start your warm weather plants as soon as you can, to keep the soil from being bare for too long.
7. Rid Garden Weeds Early: Encourage weeds to grow before you plant your garden. Lay clear plastic over your garden in early spring to warm the soil and encourage weeds to germinate. Once the weeds are several inches above the soil, pull or hoe them out and plant your crops.
8. Use Drip Irrigation: Irrigate only the plants that need it to avoid the cultivation of weeds where they are not welcome.
9. Eat Your Weeds! Some weeds like lamb’s quarters, amaranth, purslane and others—are edible when young and tender. 10. White Vinegar will kill weeds that have grown in areas in between walks, in the curbside of the street and in areas you want to rid them. It works for me! I just pour a little straight from the bottle on the villain. Soon they are dead and dried and you can brush them away. 11. Covering a garden area with cardboard after harvest is an easy way to keep weeds out till you are ready to plant again, or you want to kill weeds or grass to start a new bed.

 ‘
‘
by Susan Dean | Feb 1, 2018 | Gardening
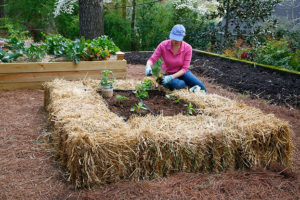
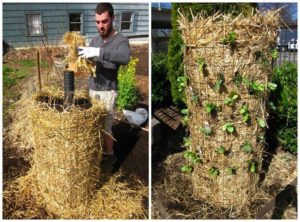
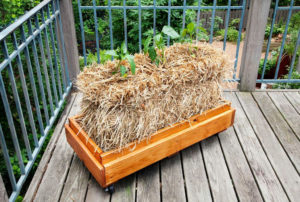
Steps for Making a Straw Bale Garden
Straw Bale Selection
Selected a bale of wheat straw, but oat and alfalfa will work. Hay has seeds and the seeds may sprout. Pine straw won’t work because it sheds water and is slow to break down. A bale bound with synthetic twine is ideal because it won’t rot. If the synthetic twine isn’t available, give the bales extra support with wooden stakes.
Arranging the Bales
Use as many bales as your space allows. Even a single bale can be productive. Arrange them end to end in a line or side to side making a square. If the bales are placed with the straw standing vertical, they are easier to plant. The bales will be heavy once you begin the curing process, so place them where you want them before you get started.
Curing the Bale
This step breaks down the interior of the bale to create a soil-like environment, composting the inside. This process takes 3 to 4 weeks if you use an organic source of nitrogen
Step One – Soaking the Bale
Soak the bale with water and keep it wet for 3 days. It will heat up as it begins to compost.
Applying Fertilizer
After 3 days sprinkle the bale with blood meal, fish emulsion, compost tea or another organic, high nitrogen product and water it in thoroughly to facilitate the decomposition. Use fish emulsion, undiluted, and pour about 2 cups evenly over the top of the bale and then water it in.
Cool Down
Composting inside the bale really heats things up. The temperature needs to come down before you can plant. Keep the soil moist and re-apply your organic nitrogen periodically until you can feel that the bale has cooled off. This should take about 2 to 3 weeks.
Topping with Compost
Once the bale is cool you are ready to plant. A two or three inch layer of compost or potting soil on top of the straw bale will help keep your plants moist until they become established. This is especially helpful for sowing seeds.
Planting
The number of plants per bale depends on the size of the mature plant. Four small vegetables, such as peppers, per bale will work and for large plants like tomatoes, plant two per bale. Vines are particularly suited to straw bale culture, as the bales keep the plants away from ground dwelling pests. For most spreading vegetables, such as squash and cucumbers, each bale can hold two plants. More plants will fit when using smaller plants like greens or herbs. Avoid root crops, and if you grow tall crops, such as corn or pole beans, be sure and use a support system such as staking the bale.
Smaller plants are easier to transplant into bales, so go for younger seedlings that you plant in regular soil.
Use a trowel to pry apart a planting crevice in the bale for garden transplants or you cut quart-sized holes in the bales themselves with a keyhole saw and fill those with a mix of compost and soil.
Fertilizing and Water
Unlike traditional gardening, your plants will be getting next to no nutrients other than what you add to the straw. Fertilize with a liquid, organic fertilizer at half strength with each watering and sprinkle and water in mineral powders such as bone meal or rock phosphate and greensand to add nutrients. Keep the bales moist throughout the growing season and keep an eye on your plants to make sure that they don’t dry out between watering.
After the Growing Season
You should be able to use your wheat straw bales for two years. After that you can compost them, or just break them up where they sit and put new bales over them. This will enrich the soil below and encourage worms to come in and improve it.

Making a Straw Bale
Choose A Sunny Spot since once the bale is wet, it’ll grow heavier to move. Put a piece of cardboard underneath to keep grass and weeds from growing into the bale. Position the bale so the side of cut straw ends is facing up.
Condition the bale before you plant. This process will take around 10 to 14 days. For the first 3 days, water the bale thoroughly so it stays damp. For the next 6 days, in addition to watering the bale, use a liquid fertilizer to add nitrogen to speed the decomposition. Simply add a capful to a gallon of water and pour it all on the bale.
As the bale goes through the conditioning process, the internal temperature may rise to 120 degrees or higher.
On day 10, return to simply watering the bale, and continue doing that until the temperature inside the bale starts to reflect the temperature outside. Use a compost or meat thermometer to keep tabs; you’ll see the temperature start to rise after the first day or two, spike about midway through the process, then start to come back down. Once it reaches ambient temperature, the bale is ready to be planted.
You can grow just about anything in a bale that you can in the ground — with a few exceptions like plants that get too tall and heavy, and can start to break the bale apart. Running plants like sweet potatoes can be harder to grow in a bale. Space plants the same as you would in the ground.
Planting The Bale
Remove straw to form a hole that is as deep as root ball of your plant (though if you’re planting a tomato, of course, you’ll want to go deeper.) Place the plant in the hole, add some quality potting soil around it for extra nutrients and stability, and fill the hole in with some of the straw you removed. Water well. Water And Fertilize plants regularly. Your plants will receive less nutrition from the bale than they would from soil, so fertilize them every week or two. Make sure the bale doesn’t dry out.